Client Management Database
MortgageClientsXP User Guide
Converting
Your Data From a Previous Version
Create
Letter as Word Document
Contact: clientdatabase@rogers.com
Starting for the First Time.
Important Note: The steps in this document assume that you have already copied the program to your computer. If you have not already setup the program on your computer, you should go to the support web site http://clientdb.softmv.com and look at the Database Initial Setup document.
You can start your program in 2 ways:
- Double-click on the shortcut that you created during your setup
OR
- Start
Microsoft Access, or click on
the new shortcut that you have just created.
- In Microsoft Access, choose to open the database ClientProgramXP, from the folder that you copied it to.
- When the program starts, it will ask you to create a client database. Click YES.

- Click
on Create Database

- Choose folder where you want to create your new client database. Click OK. (suggestion: dont change folder name, just click OK immediately)

8. The message below will be displayed. Type a name for your
new database. Click OK.

9. This message will appear.

Converting Your Data From a Previous Version
If you are new user to the Client Database, then skip this section.
If you have used a previous version of the Client Database, then you can follow these screens to upgrade your data to the new version.
- You may asked to open a database when you start the program, if you were not asked then click on Open or Create Another Client Database from the main menu.

- Choose Open Database

- Find your data database in the normal manner, by go to folder where your data is contained. Then double-clicking on you database.

- If you have opened a valid database then you will be given a message very similar to this message:

- You will then be told that the database is from a different version, click OK:

- Then you will be asked to confirm the conversion to the new version of the database:

- You
will now be told what the new name of your database will be. Click on Click Here to complete the conversion process:

Main Menu

- Manage Clients
- Choose this option to:
- Add/Update clients
- Email Clients
- Create Mail Merges
- Create Letters/Labels (through mail merge function)
- Create Excel Spreadsheet of your clients (through mail merge function)
- Reports
- Choose this option to print reports by various methods
- Open or Create Another Client Database
- Choose this option to create a different database of clients, or to open a client database that you have already created
- Backup or Copy Your Current Database
- This is an easy way to make a copy of your data to another location
- Preferences
- Choose this option to change your database preferences
- Helpful Weblinks
- A list of helpful websites that might help with your day to day processing
- Reminders
- If you have your preferences setup to show you closing and renewal reminders, then they will show up here.
- This reminders list will also show any custom reminders that you have setup for a client. (see the reminders setup screen further in this document)
This screen is your main working screen.
Choose a client from the list on the left, and their information will show on the right.
You have a choice of showing both 1st Person and 2nd Person in your list. You can turn this on and off from your Preferences, in the main menu.
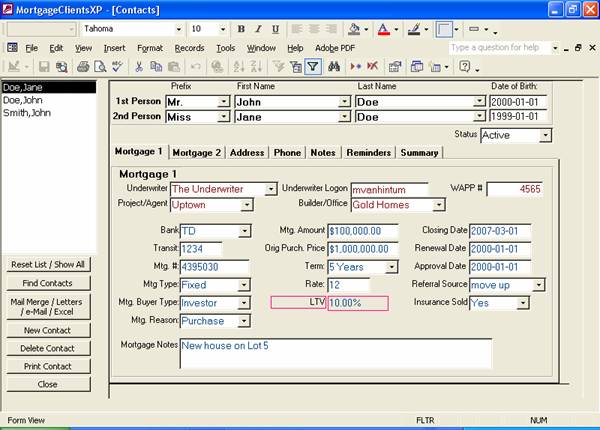
- Reset List / Show All
- This will reset the list so that it shows every client in your database
- Find Contacts
- This
will bring show you a Contact List Criteria screen, which will allow
you to find contacts by date, name, birth date, etc,
- Mail Merge / Letters
- Choose
this option to create the mail merge database, and then go through the
process of creating letters/envelopes or labels
- New Contact
- Creates
a new contact
- Send eMail
- Choose
this option to send an email to your clients, you have the option of
sending to all contacts in your list or just one contact
- Delete Contact
- Delete
the currently selected contact
- Print Contact
- Print
the currently selected contact
2nd Mortgage Screen

The Mortgage 2 makes it easy to associate a second mortgage with a client.
Address Screen
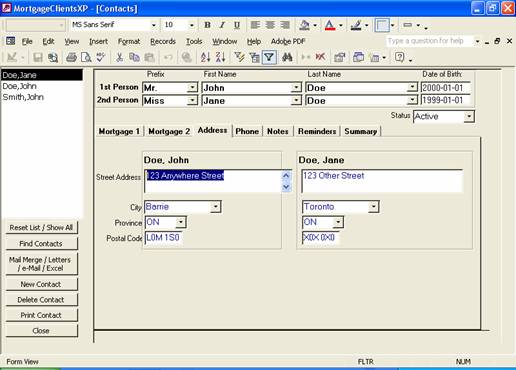
The address screen allows you to enter multiple addresses for a client.
Phone Screen
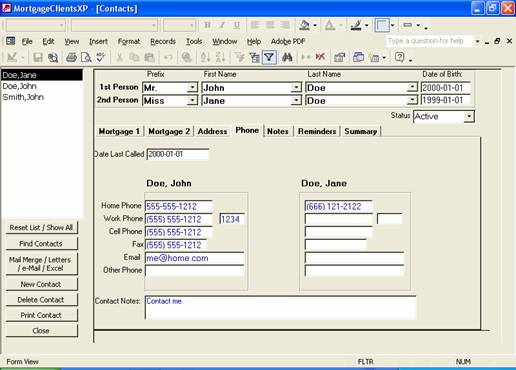
The phone screen allows you to keep various types of contact method for your clients.
You may also keep additional contact notes here.
Notes Screen

Use the Notes screen to add any additional notes that you
might have.
Reminders Screen
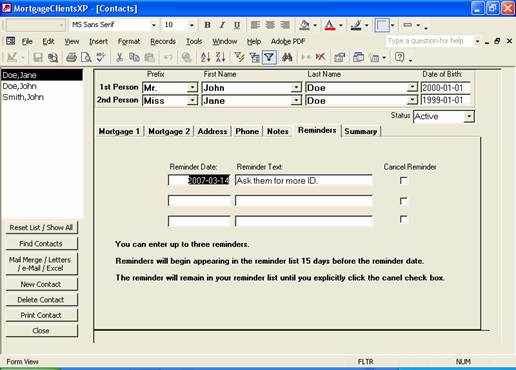
Use the Reminders screen to remind yourself of anything related to your contact.
Find Contacts
This screen is called from various places. It helps you find contacts, and then returns the list to your Contacts screen or your reports screen.

- Choose the information you want to find. For example, for everyone with a Birthday Month in March, choose 3 in Birthday Month.
- Click on Refresh Preview to see who matches what you want to find.
- Click Apply, to apply this search.
Note: You dont have to click on Refresh Preview. You could go directly from step 1 to step 3.
Below are some
additional search hints:

Mail Merge / Letters
The Mail Merge / Letters function sends your client database to an Access Database called MailMerge.MDB.
You can also export your client database to an Excel
Spreadsheet, to create your own reports.
After you create Mailmerge.mdb you can do the following:
- print envelopes
- print mailing labels
- print letters that you have saved in the database
If you are able to use Mircosoft Words Mail Merge functions. You can also go to Microsoft Word and create your own letters and labels.
Mail Merge Options

- You have the choice of creating c:\mailmerge.mdb or a spreadsheet.
- Unless you want a spreadsheet choose the first option.
Letters / Envelopes / Labels
After your mailmerge.mdb is created, you can choose to go to the letter writer, print labels, or print envelopes.

You also have the option of creating your own mail merge.
To do this:
· close Microsoft Access
· open Microsoft Word
· from the Word menu choose Tools-->Letters and Mailing-->Mail Merge Wizard
The Mail Merge Wizard will guide you through the process of creating a Mail Merge.
Notes:
1) When creating your
own mail merge, use c:\mailmerge.mdb as your source.
2) Envelopes are formatted to standard 8.5 inch width envelopes.
3) Labels are formats
to Avery 5160 or 8160 labels
Writing Letters
Manage List of Letters
This screen is called from the Mail Merge button.
With this screen, you can add your own letters that you can use for mass mailing through Microsoft Words mail merge functionality.
You can create as many letters as you want.

- New Letter
- click here to add a new letter to your database (see instructions later in this guide)
- Close
- close this screen and go back to managing your contacts
- Create Word Document
- create a Microsoft Word mail merge document that you can print and modify
Create Letter as Word Document
From the the Letters form, you can
choose to create a Microsoft Word document from any of the letters that you
have saved in your database.
- Click on the letter that you want to print (or create a new letter)
- If you wish, make modifications to the text the body of the letter
- Click on Create Word Document button

- Respond
to the message below:

5. Choose Which names should appear. in the salutation.

6. Wait for the program to create the documents.

7. When successful the following message will appear. Two Word documents were created. The mergetemplate document is a fully functioning mail merge document. The mergedoc document, will contain the letters that you will want to print.

You now can now choose to close the Client Database and open either your mergetemplate document or your mergedoc fully merged document.
Using the New Letter
button you can add new letters to your client database.
1. Click on New Letter button
2. Type the name of your new
letter. Click OK

3. Begin typing the Body of your letter.

Open / Create Client Database
- Open Database
- Choose to open a client database that you have already created
- Create Database
- Choose to create a brand new client database
- Cancel
Open Database
1. Click on Open Database
2. Choose folder where your database and then click on the database. Then click OK

Create Database
1. Click on Create Database
2. Choose Folder Location for your database. Then click OK. Note: Just the folder, not the name of the database

3. Type the Name of your new database. Then click OK.
4. This message will appear.
Reports Menu
- Click on find contacts to choose which contacts that you want to include in the report.
- Click
on the report that you want to create.

Preferences
Choose Preferences from the main menu.
- Choose
your option and then click Save and
Exit.

- Show only 1st Person in Contact List
- Show both first and 2nd person in Contact List
Backing Up Your Data
To protect yourself from loss of information, it is important to make sure that you, from time to time, copy your data to a backup somewhere other than your computer. Here is how you backup your client database:
- Choose
 from the main menu.
- Click
OK on this message

- Choose
the folder where you want to save your backup, then click OK:

- Type
the name of your backup file:

- The program will now copy your data, and when complete you will get this message.
